Bruteforce SSH Alerting & Automated Response
Bruteforce SSH Alerting & Automated Response
Bruteforce SSH Alerting & Automated Response
_________________
"The best way to predict the future is to create it."
— Peter Drucker
"The best way to predict the future is to create it."
— Peter Drucker
"The best way to predict the future is to create it."
— Peter Drucker
Project Introduction: SOAR Workflow: Detecting SSH Alerting & Automated Response
This project outlines the deployment of an automated detection and response system designed to mitigate persistent SSH brute-force login attempts. Utilizing Elastic Stack, TheHive, and Fail2Ban, this solution provides real-time monitoring, alert escalation, and automated remediation of unauthorized SSH access attempts.
The detection workflow is structured to identify repeated failed login attempts, trigger alerts, and escalate incidents to a response system. Upon validation, the system automatically blocks the originating IP address, mitigating the risk of unauthorized access.
Compliance Considerations:
- NIST 800-53 SI-4 (System Monitoring): Ensuring real-time detection and alerting of security threats.
- ISO 27001 A.12.4 (Logging & Monitoring): Implementing centralized monitoring for SSH access attempts.
- PCI DSS 4.0 8.3.6 (Strong Authentication for Admin Access): Enforcing secure authentication mechanisms.
Environment Setup
Environment Setup
To begin, we'll navigate to our VMHost machine and within Hyper-V Manager spin up a new VM named SSHBastion. This machine will act as our Jumphost, and will have ssh capabilties to other machines within the network.
We'll begin provisioning the machine with the following configurations:
OS: Ubuntu Server 24.04
Disk Space: 127gb
RAM: 8gb
Networking: Internal vSwitch bridged @ 10.0.1.0/28

Compliance Considerations:
- NIST 800-53 (Configuration Management): Enforces structured system provisioning with secure configurations.
- ISO 27001 (Access Control Policy): Establishes a controlled SSH access point to internal systems.
Compliance Considerations:
- NIST 800-53 (Configuration Management): Enforces structured system provisioning with secure configurations.
- ISO 27001 (Access Control Policy): Establishes a controlled SSH access point to internal systems.
Once the SSHBastion virtual machine is successfully booted, we log in and proceed with system updates to ensure the latest security patches are applied.
Following this, we begin the deployment of Elastic Agent to facilitate log collection and monitoring.
During deployment, we configure a dedicated agent policy specifically for SSHBastion. Unlike the policy assigned to the Ubuntu user machine, this configuration excludes Elastic Defend's Endpoint Detection and Response (EDR) capabilities, as its primary purpose is to ingest and analyze SSH authentication logs rather than enforce host-level protections.
After executing the installation script, we verify that Elastic Agent has been successfully enrolled and is reporting logs to the Kibana Fleet Dashboard.

Compliance Considerations:
NIST 800-53 SI-7 (Software Integrity): Ensuring system updates are applied to maintain security integrity.
ISO 27001 (Security of System Updates): Implementing updates to mitigate vulnerabilities before deploying security controls.
PCI DSS (Logging of Administrative Actions): Ensures all administrative configurations, including agent deployments, are logged for auditing.
II. Log Collection & Analysis
II. Log Collection & Analysis
Now that Elastic Agent is successfully ingesting logs from the SSHBastion server, we can begin filtering and analyzing the data to configure our alerting mechanism.
To do this, we navigate to the Kibana web interface and, from the left-hand menu, select "Discover" under the Analytics section. This interface provides a real-time view of collected logs, allowing us to inspect authentication events and refine our query for SSH-related security incidents.
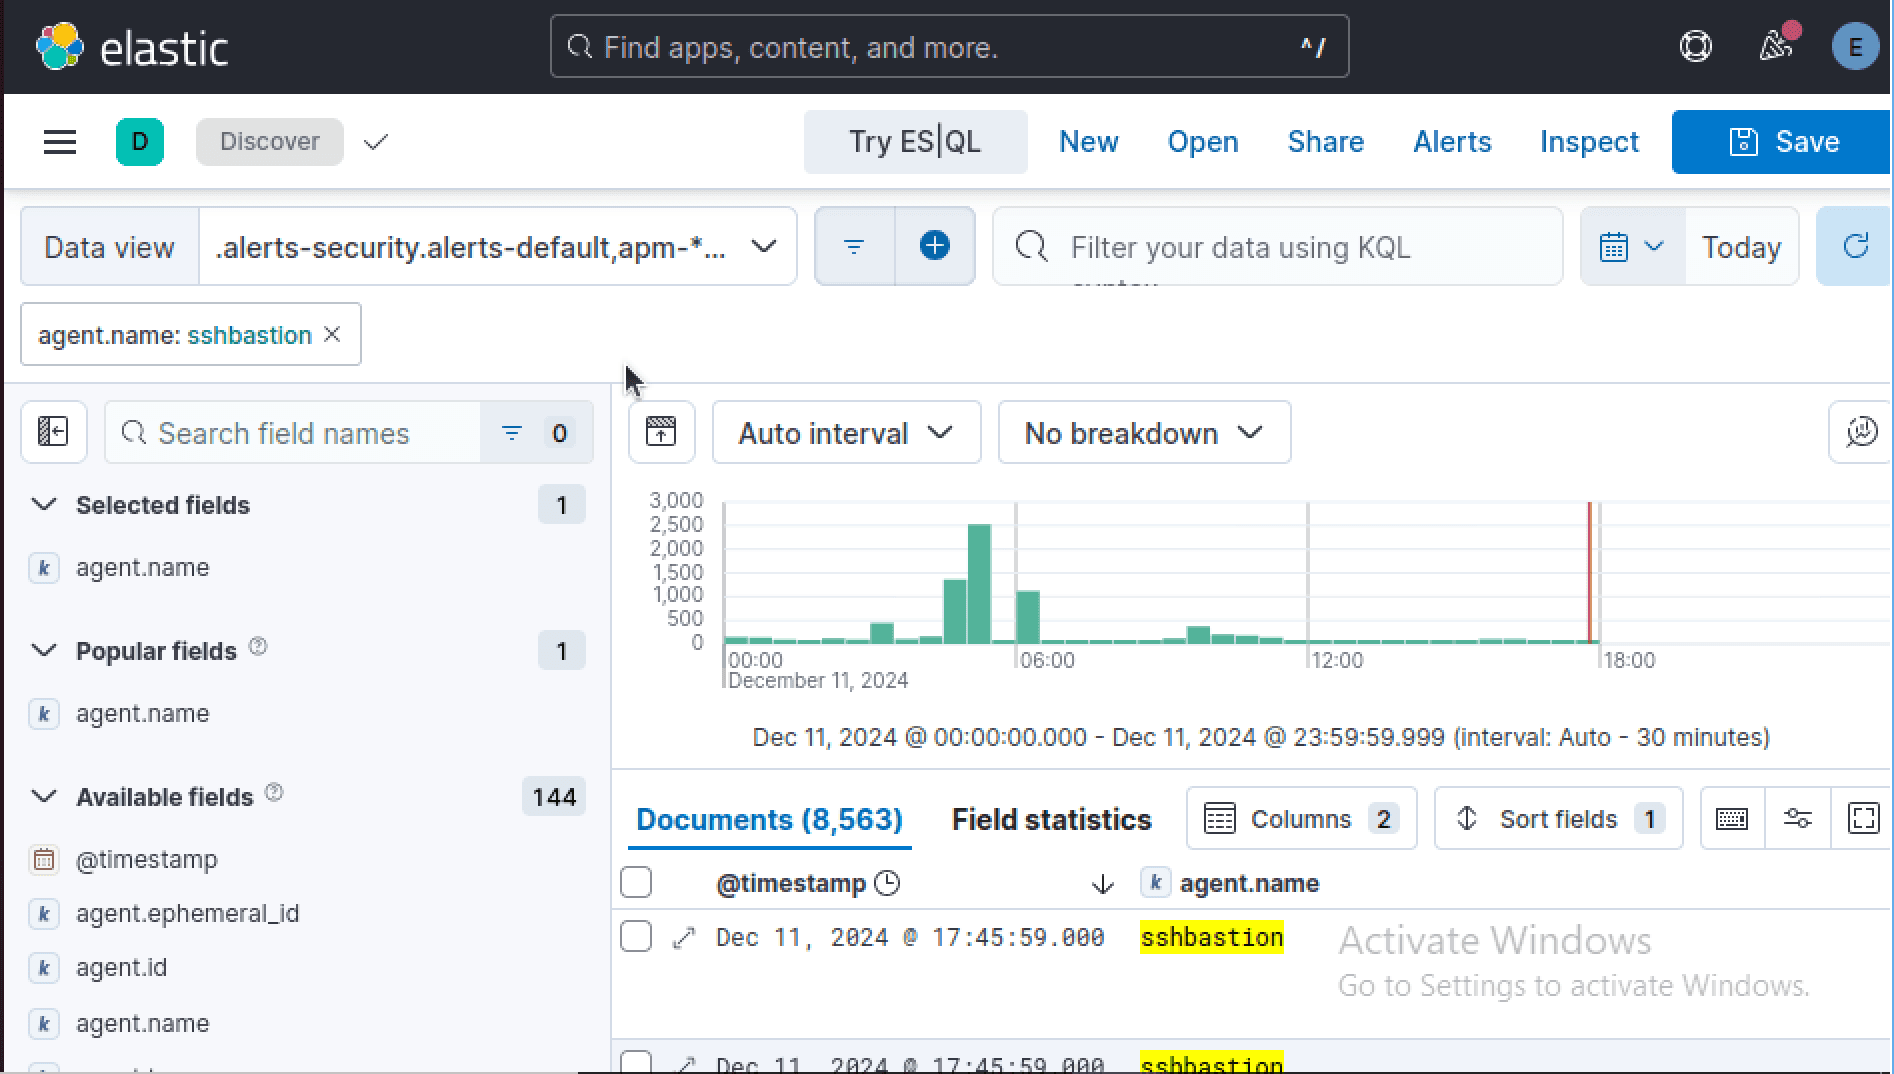
From here, we filter logs by selecting agent.name, narrowing the dataset to only logs originating from the SSHBastion server.
Now that Elastic Agent is successfully ingesting logs from the SSHBastion server, we can begin filtering and analyzing the data to configure our alerting mechanism.
To do this, we navigate to the Kibana web interface and, from the left-hand menu, select "Discover" under the Analytics section. This interface provides a real-time view of collected logs, allowing us to inspect authentication events and refine our query for SSH-related security incidents.
From here, we filter logs by selecting agent.name, narrowing the dataset to only logs originating from the SSHBastion server.
Compliance Considerations:
NIST 800-53 AU-6 (Audit Review and Analysis): Ensuring security logs are analyzed to detect potential threats.
ISO 27001 (Event Logging): Implementing real-time log review for security monitoring.
Compliance Considerations:
NIST 800-53 AU-6 (Audit Review and Analysis): Ensuring security logs are analyzed to detect potential threats.
ISO 27001 (Event Logging): Implementing real-time log review for security monitoring.
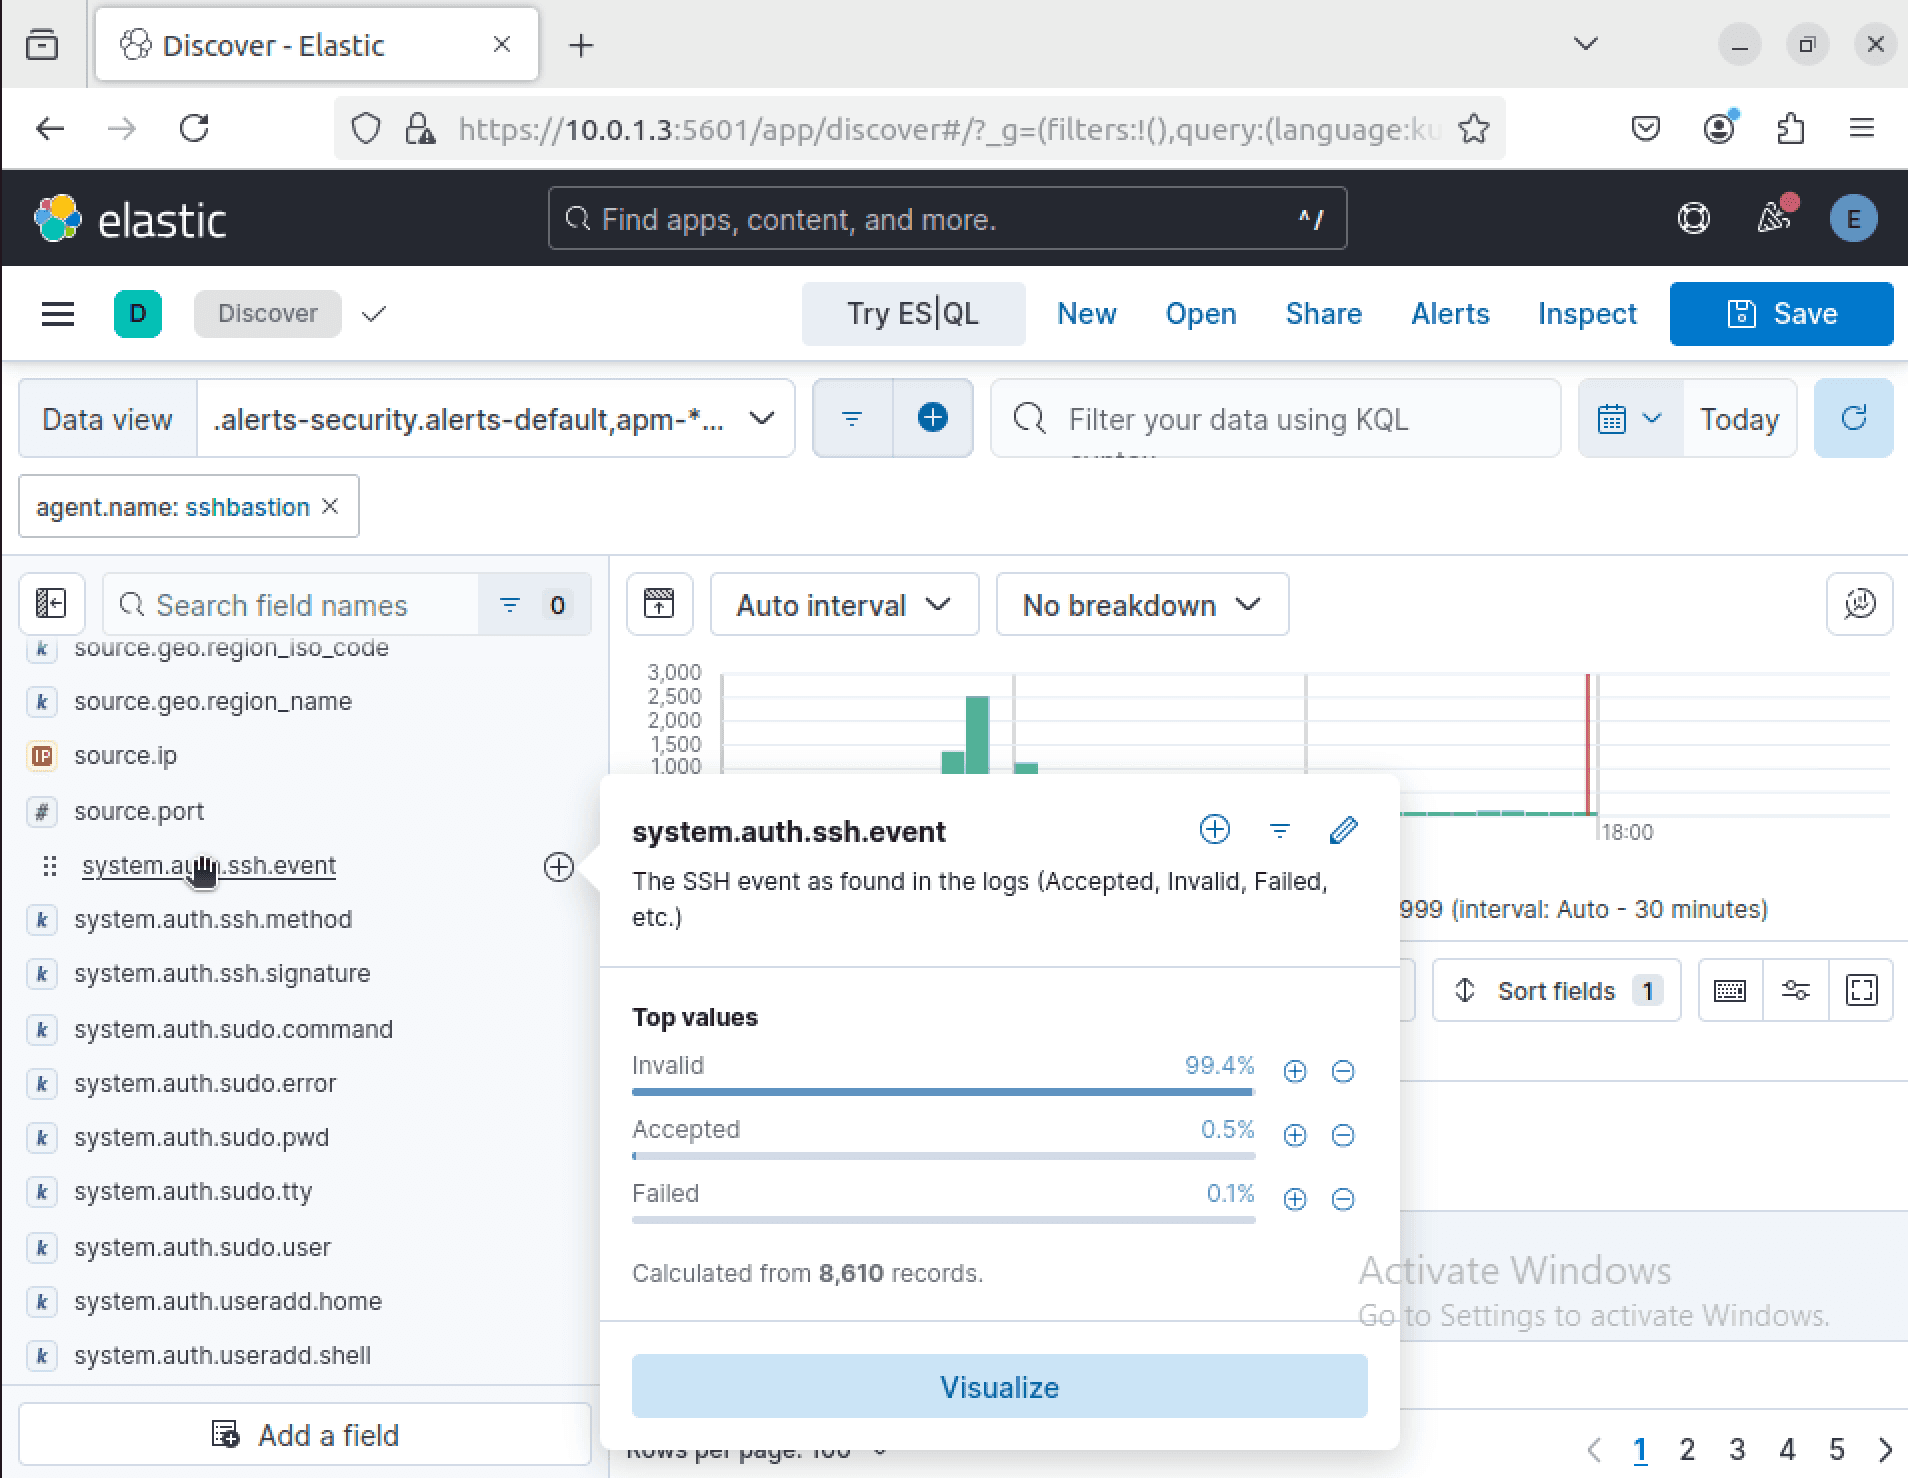
As we scroll through the log data, we locate the system.auth.ssh.event field, which categorizes SSH authentication attempts. Expanding this field reveals the most common event values:
Invalid – An authentication attempt using an unrecognized or incorrect username.
Accepted – A successful login.
Failed – A failed authentication attempt due to incorrect credentials.
Since failed authentication attempts can indicate potential brute-force attacks, we use this field as the basis for our alerting mechanism. To enhance visibility, we add this field as a column by clicking the "+" button in the Kibana interface.
Compliance Considerations:
NIST 800-53 AU-12 (Audit Log Generation): Ensures security logs capture authentication events for analysis.
ISO 27001 (Administrator & Operator Logs): Requires tracking of authentication-related security events.
PCI DSS (Logging of Failed Authentication Attempts): Mandates logging of failed authentication attempts for security monitoring.
To further enrich our analysis, we add additional relevant fields from the available fields pane. One particularly useful field is user.name, which identifies the username associated with each authentication attempt.
This allows us to correlate failed login attempts with specific user accounts, helping to detect unauthorized access attempts or compromised credentials.
To enhance visibility, we add user.name as a column by clicking the "+" button in the Kibana interface. This enables us to quickly filter and analyze authentication attempts based on specific users.

Compliance Considerations:
NIST 800-53 AU-3 (Content of Audit Records): Ensuring logs capture user identifiers for authentication events.
ISO 27001 (Event Logging): Requires logging of user authentication details for security monitoring.
PCI DSS (User Identification Logging): Mandates tracking of usernames for all authentication events.
At this stage, we observe that some entries in the system.auth.ssh.event field are empty, which does not provide useful security insights. To focus on potential brute-force attempts, we refine our dataset by filtering only events where the value is "Failed".
To apply this filter in Kibana, we locate a row within the system.auth.ssh.event field that has the value "Failed", click on it, and then select the "+" button. This ensures that only failed SSH authentication attempts are displayed, allowing us to focus on detecting unauthorized access attempts.

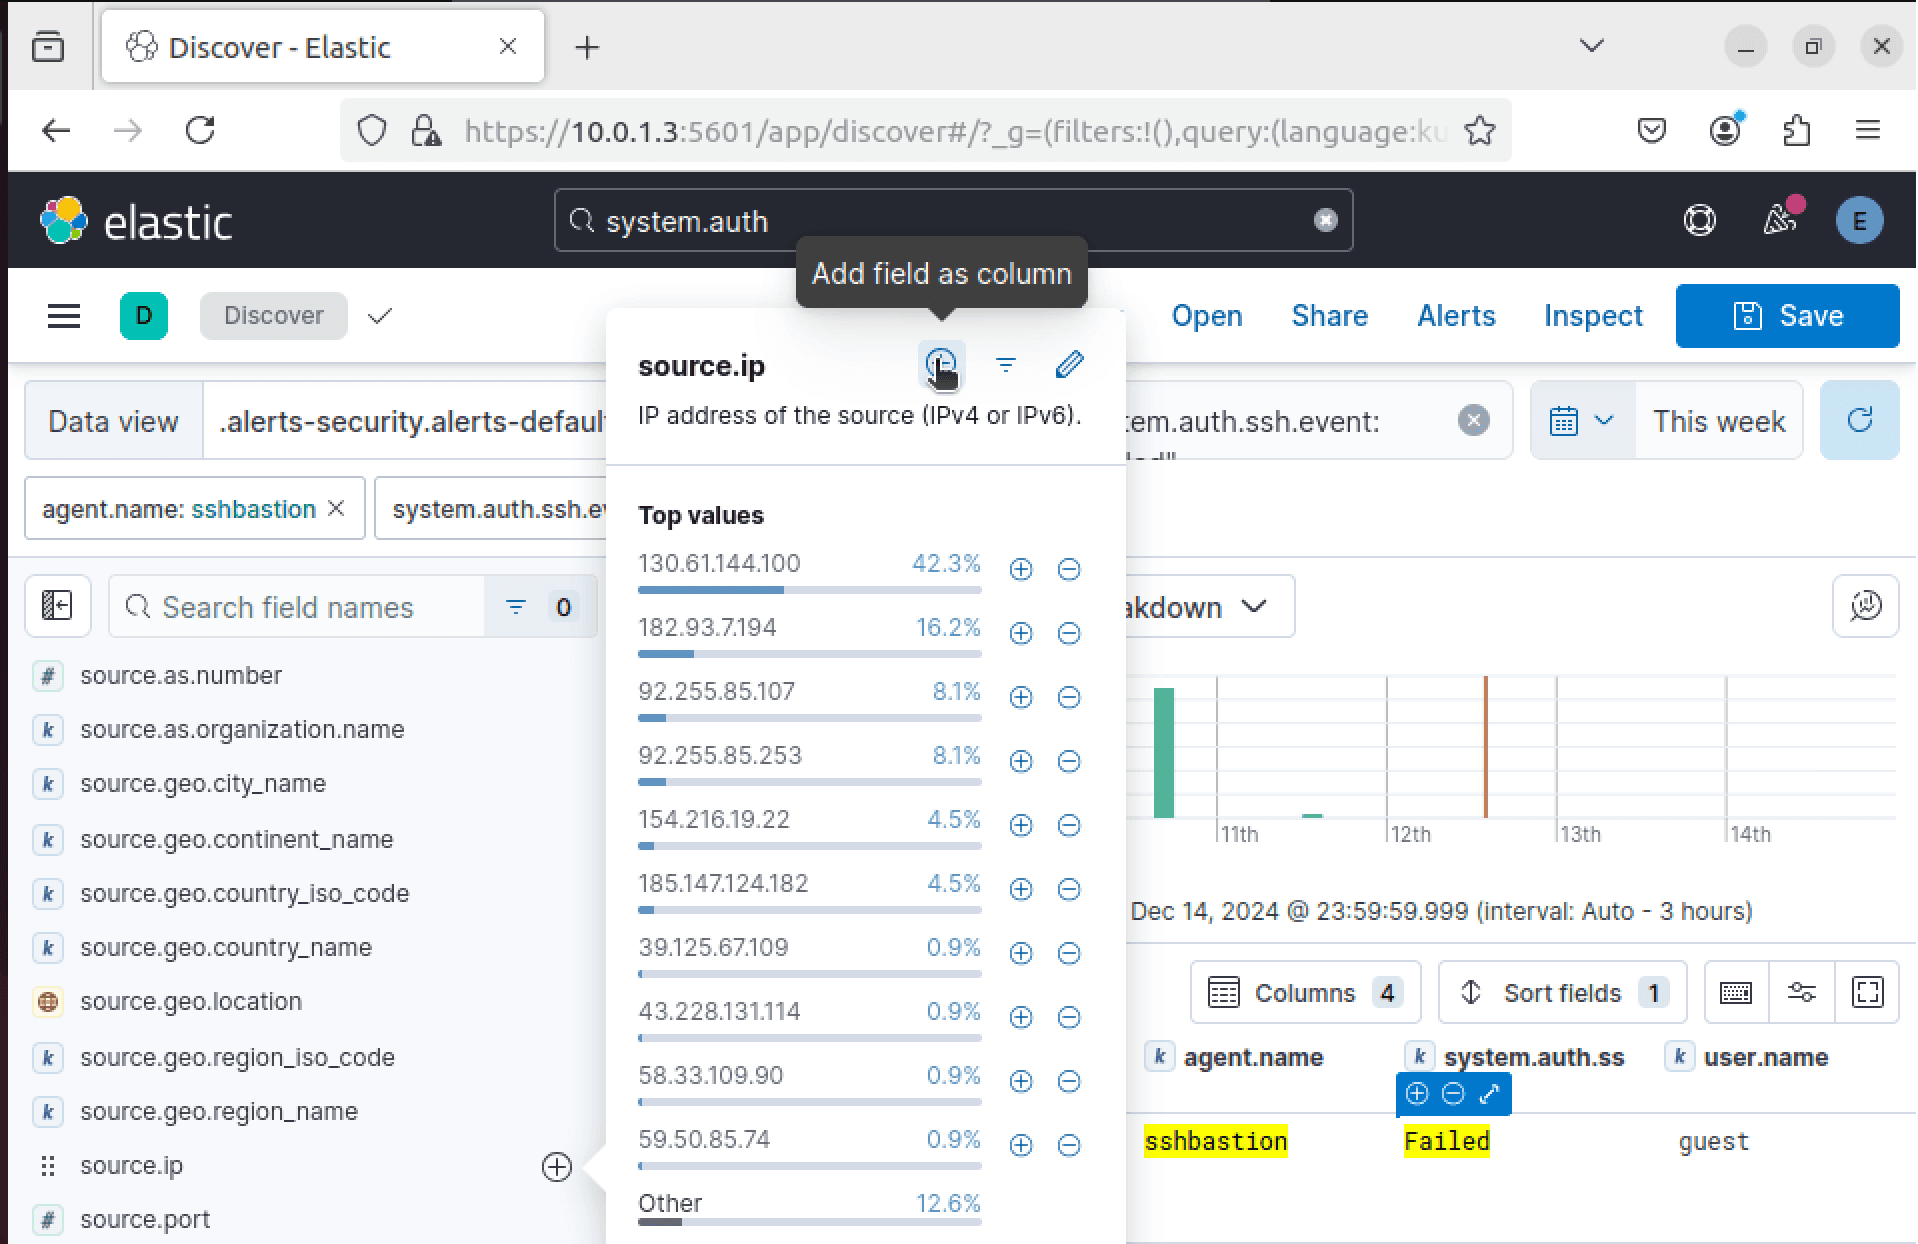
To further enhance visibility and threat correlation, we also track the source IP address associated with each authentication attempt. Identifying repeated failed login attempts from the same IP can help us detect brute-force attacks or unauthorized access attempts originating from a single source.
Fortunately, Kibana provides the source.ip field, which captures the originating IP address of each SSH login attempt. We add this field as a column by clicking the "+" button, allowing us to easily filter and analyze authentication attempts based on their originating source.
Compliance Considerations:
NIST 800-53 AU-14 (Session Audit and Monitoring): Requires tracking of source IP addresses for authentication events.
ISO 27001 (Audit Trail for User Activities): Mandates logging of access attempts, including source identifiers.
PCI DSS 4.0 10.2.5 (Source Identification Logging): Ensuring failed authentication attempts are correlated with source IPs for security investigations.
To further enhance threat analysis, we can extract geographic information associated with SSH authentication attempts. Identifying the country of origin for failed login attempts helps in detecting suspicious access patterns, such as logins originating from unexpected locations or known malicious regions.
Kibana provides the source.geo.country_name field, which logs the geographic origin of each authentication attempt based on the source IP. We add this field to our visualization by selecting it from the available fields and clicking the "+" button, allowing us to track authentication attempts by country and correlate them with other indicators of compromise.

Compliance Considerations:
NIST 800-53 (Audit Log Generation): Ensuring log entries include relevant metadata for security investigations.
ISO 27001 (Event Logging): Requires logging of network access attempts, including geographic data where applicable.
PCI DSS (Source Identification): Mandates tracking of login attempts, including geolocation, for anomaly detection.
At this stage, we have filtered and structured our log data to display only SSH authentication attempts, including the source IP address, geographic origin, and authentication result. This dataset provides a comprehensive view of failed login attempts, allowing us to identify patterns of unauthorized access effectively.
To preserve this query for future analysis and alerting, we save the log search by clicking the save icon in the top-right corner of the Kibana interface. We'll name this search "SSH-Failed-Auth", ensuring that we can quickly reference and modify it when creating detection rules.

III. Threat Detection & Alerting
III. Threat Detection & Alerting
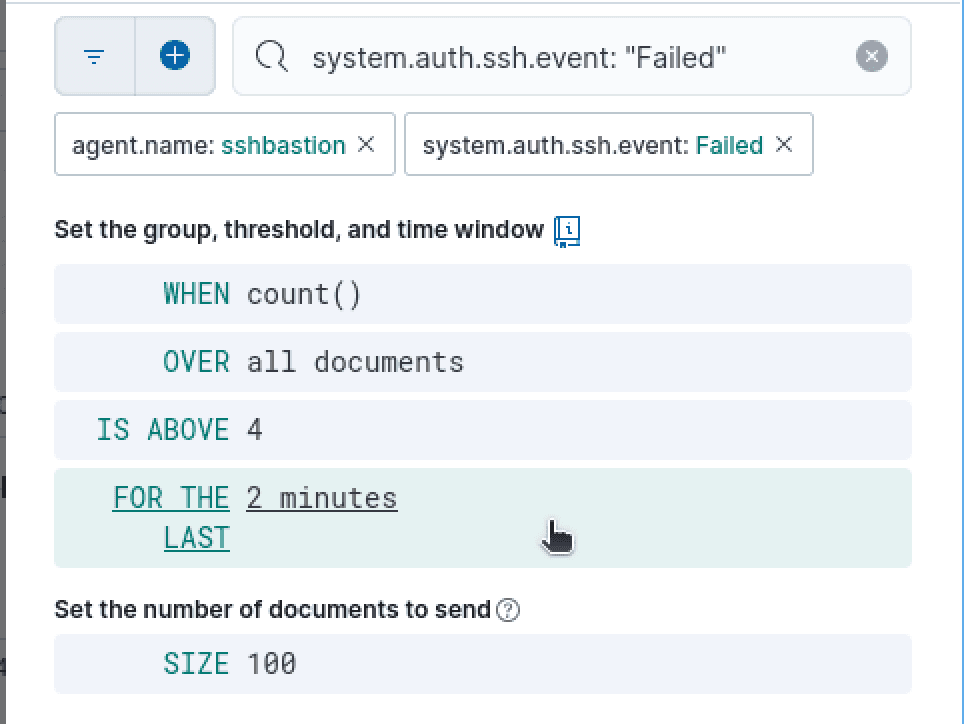
With our SSH-Failed-Auth search saved, we can now proceed with creating a search threshold rule to automate alerting for potential brute-force attacks.
To begin, we navigate to "Alerts", located next to the save icon in the Kibana interface. From here, we select "Create search threshold rule", which allows us to define conditions that will trigger alerts when multiple failed authentication attempts occur within a specified timeframe.

On the next page, we begin by naming our search threshold rule, ensuring it is clearly identifiable for monitoring and incident response. As we scroll down, we observe that the alert configuration is automatically populated with our saved query and filtering parameters, simplifying the rule creation process.
The query is already set to filter logs from our Elastic Agent installed on SSHBastion, specifically targeting events where system.auth.ssh.event equals "Failed". To establish a detection threshold, we configure the rule to trigger an alert when more than four failed authentication attempts occur within a defined timeframe. This setting enables us to detect and respond to potential brute-force attacks efficiently.
We can then save the rule with no actions

Compliance Considerations:
ISO 27001 A.12.4.1 (Event Logging): Supports automated tracking of authentication failures for security auditing.
PCI DSS 4.0 10.2.4 (Failed Login Attempt Monitoring): Requires detection mechanisms for excessive failed authentication attempts.
Compliance Considerations:
ISO 27001 A.12.4.1 (Event Logging): Supports automated tracking of authentication failures for security auditing.
PCI DSS 4.0 10.2.4 (Failed Login Attempt Monitoring): Requires detection mechanisms for excessive failed authentication attempts.
IV. Incident Response & Mitigation
IV. Incident Response & Mitigation
With the search threshold rule configured, the next step is to integrate automated incident response by sending alerts to TheHive. This allows us to escalate security incidents and trigger automated actions, such as blocking the offending IP address.
To set up this integration, we navigate to Stack Management > Connectors in Kibana and select "Create connector". This enables us to define a webhook connection that will forward brute-force alert data to TheHive for further investigation and response automation.

Compliance Considerations:
NIST 800-53 IR-4 (Incident Handling): Ensures automated escalation of security incidents.
ISO 27001 (Response to Security Incidents): Implements a structured approach to incident response.
PCI DSS (Security Incident Response): Requires mechanisms for detecting, escalating, and responding to security events.
We will then scroll down until we find TheHive and select it
We will then scroll down until we find TheHive and select it

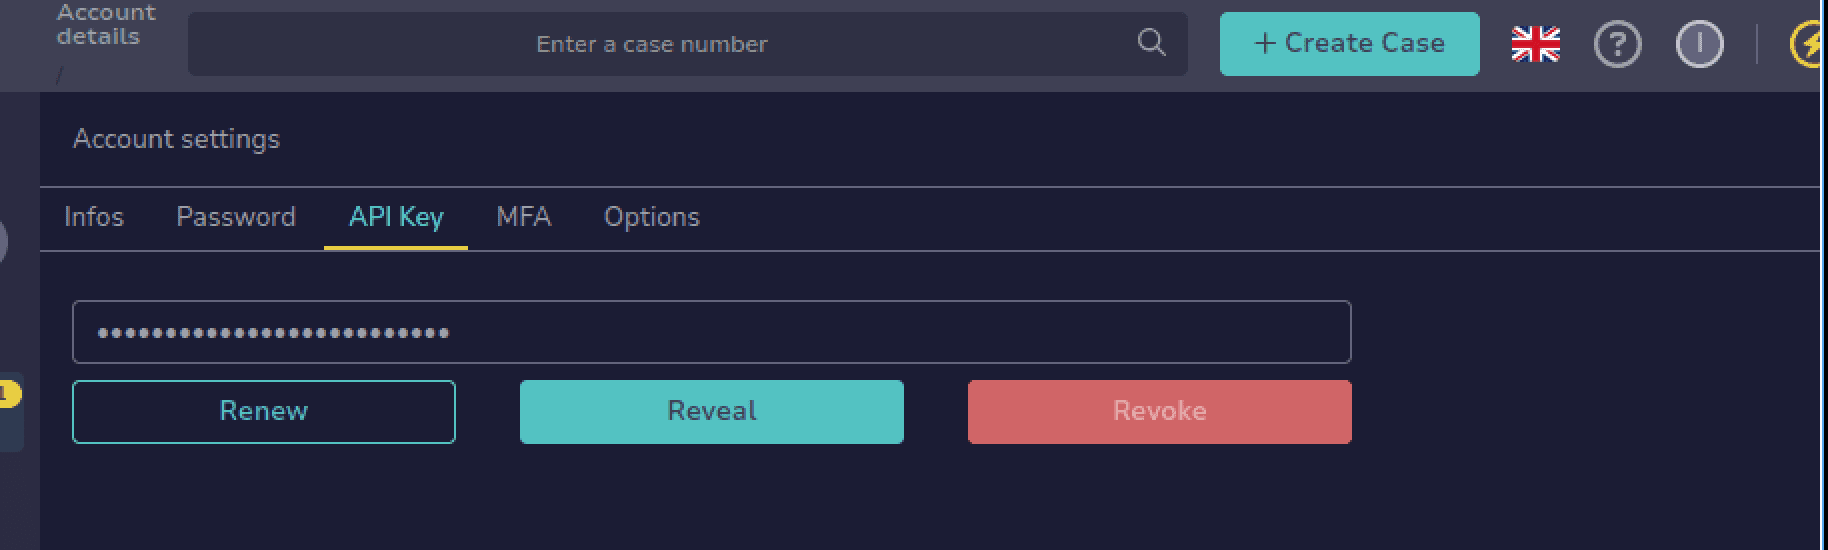
Before proceeding with the webhook configuration, we must retrieve an API key for authentication with our TheHive instance. This ensures that alerts sent from Kibana are securely transmitted and recognized by TheHive.
To obtain the API key, we navigate to our TheHive VM, log in to the TheHive admin account, and proceed to:
Account > Settings, where we generate and configure an API key for use with the Kibana Connector. This key will be required to authenticate requests between Kibana and TheHive, enabling seamless alert forwarding.
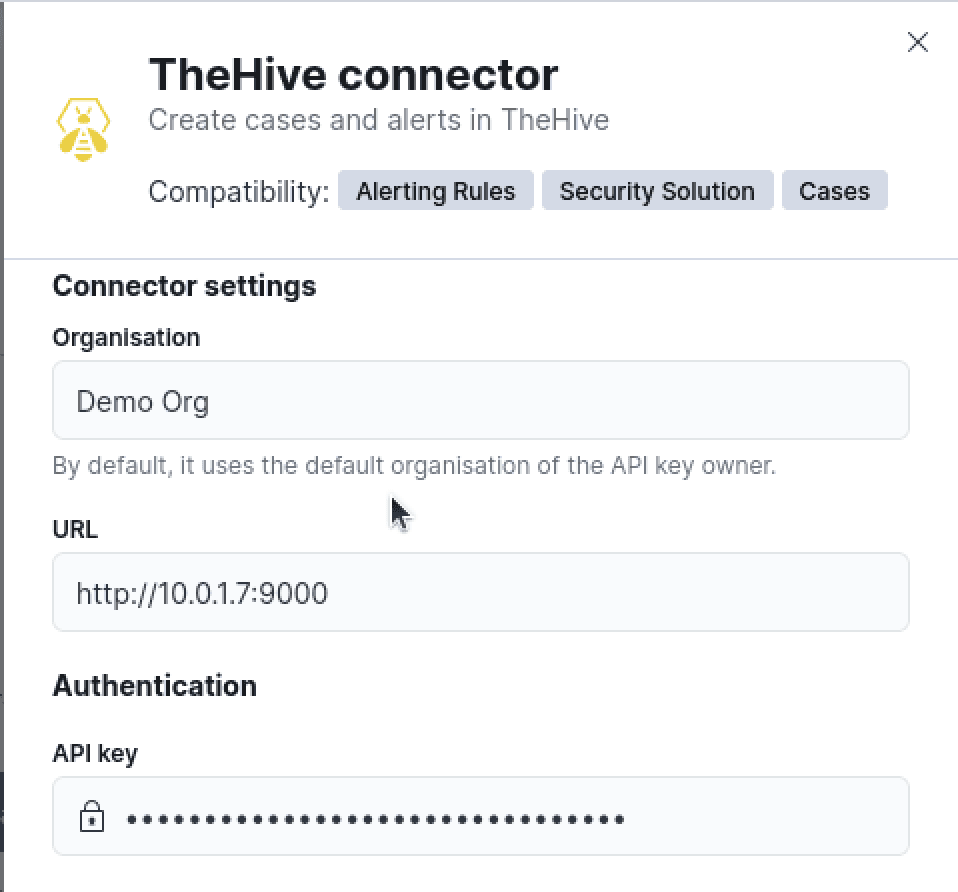
Next, we return to our Kibana VM, where we previously initiated the connector setup. Here, we proceed by entering the necessary configuration details to establish a secure connection between Kibana and TheHive.
Organization Name: Matches the configured workspace within TheHive.
API Key: The authentication token generated from TheHive’s settings.
TheHive URL: The host address and port where TheHive is deployed and accessible by Kibana.
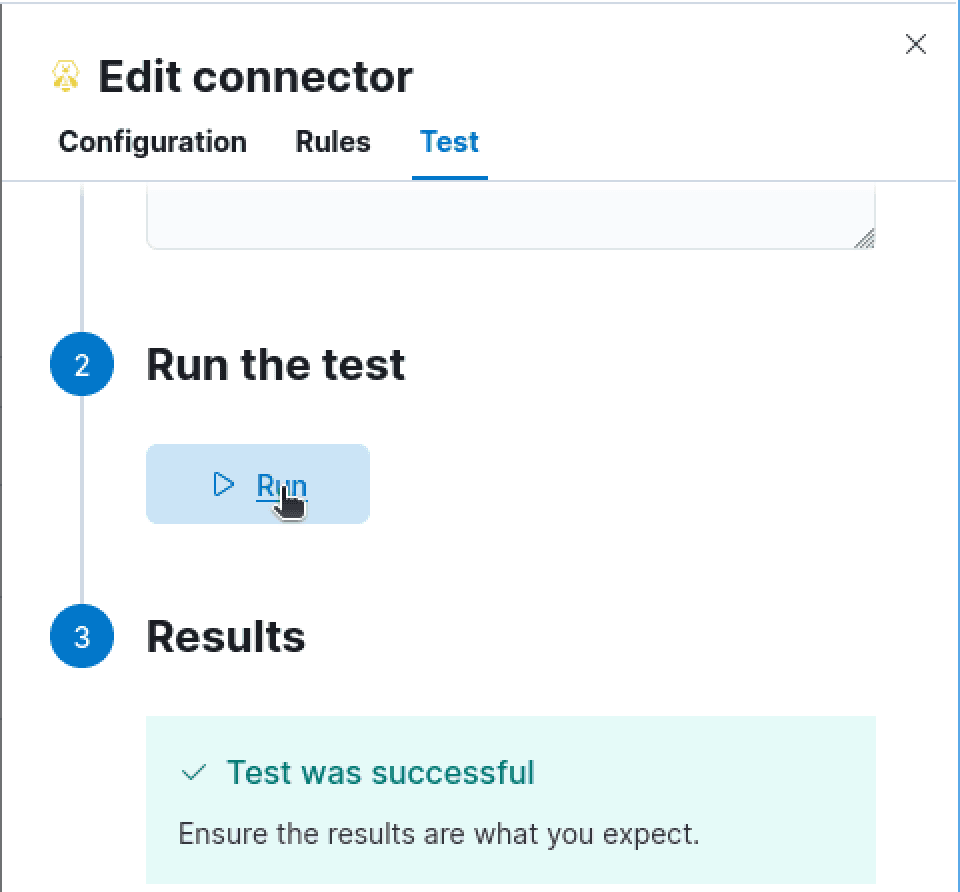
Now we'll test the connector within Kibana to make sure it can reach TheHive successfully
Now we'll test the connector within Kibana to make sure it can reach TheHive successfully
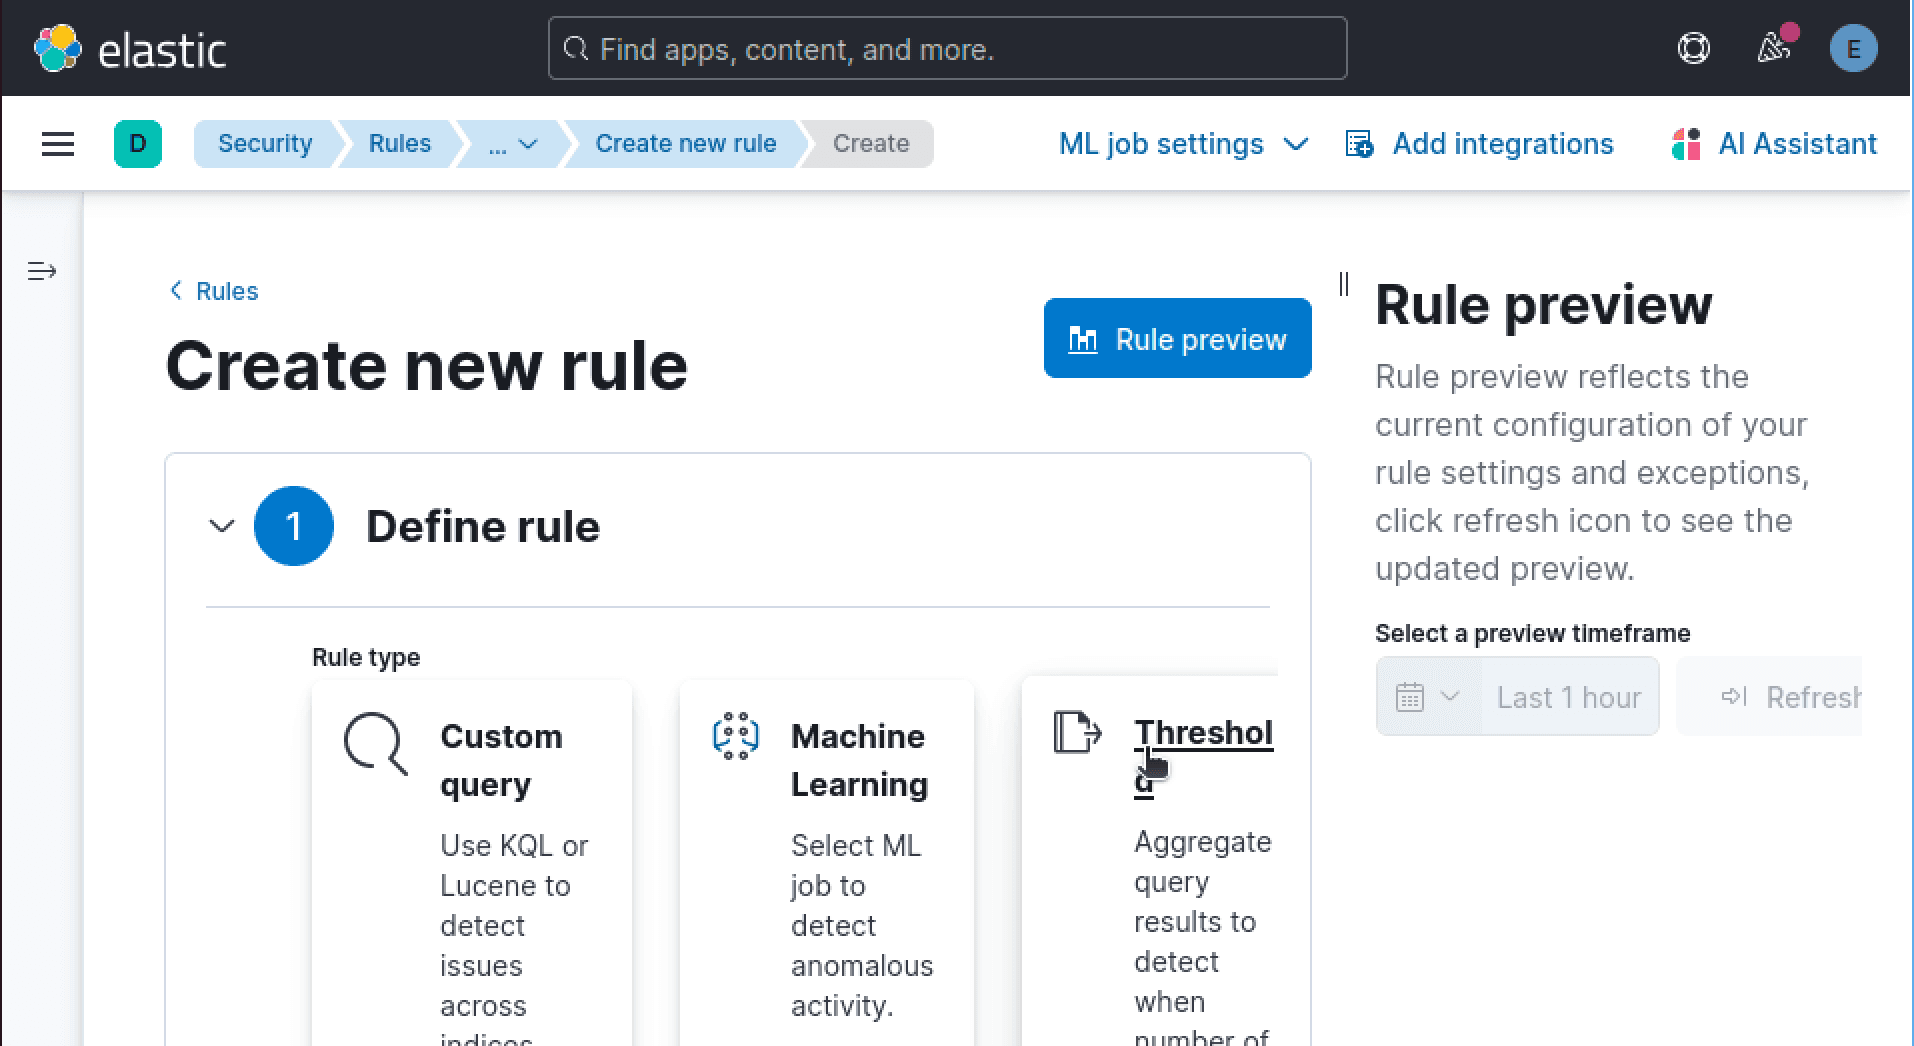
Now that the connector for TheHive is in place, we need to ensure our alerts are forwarded externally to TheHive for incident escalation and automated response.
While our initial search threshold rule in Kibana detects and logs failed SSH authentication attempts internally, we must now create a SIEM detection rule to send these alerts to TheHive.
To do so, we navigate to Security > Rules and select Detection Rules (SIEM). Here, we define a new detection rule that references our saved query (SSH-Failed-Auth) and applies the same threshold condition (4+ failed authentication attempts within 2 minutes).
Next, we configure the response action, specifying our TheHive webhook connector as the destination. This ensures that whenever the rule is triggered, an alert is automatically sent to TheHive, where it can be further analyzed and acted upon.


Compliance Considerations:
NIST 800-53 IR-4 (Incident Handling): Ensures automated escalation of detected threats.
ISO 27000 (Security Incident Response): Defines structured processes for alerting and response.
PCI DSS (Security Incident Monitoring & Reporting): Requires mechanisms for forwarding detected threats to an incident response system.
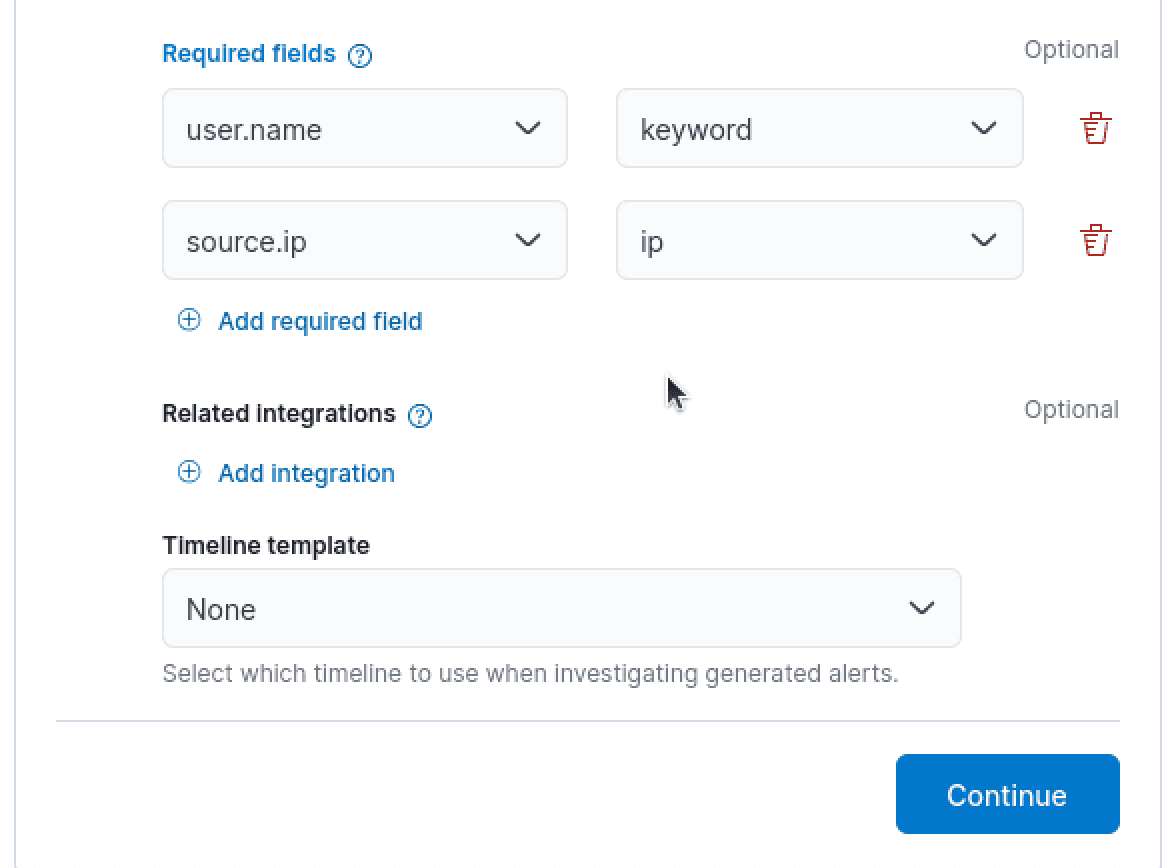
Scrolling down, we'll choose to group by user.name and source.ip index patterns, setting the information most pertinent to us
Scrolling down, we'll choose to group by user.name and source.ip index patterns, setting the information most pertinent to us

As well as grouping by these index patterns, we'll scroll down further and set them as required fields, also specifying type
As well as grouping by these index patterns, we'll scroll down further and set them as required fields, also specifying type
Conclusion
This small showcase was the series of steps I had taken to allow VPN connectivity through Azure VPN deployment into my internal homely resources using a P2S connection and enabling S2S functionality.
Though there were a few hurdles and issues encountered during deployment, after deploying, connection to the internal file server (FS1) was successful!
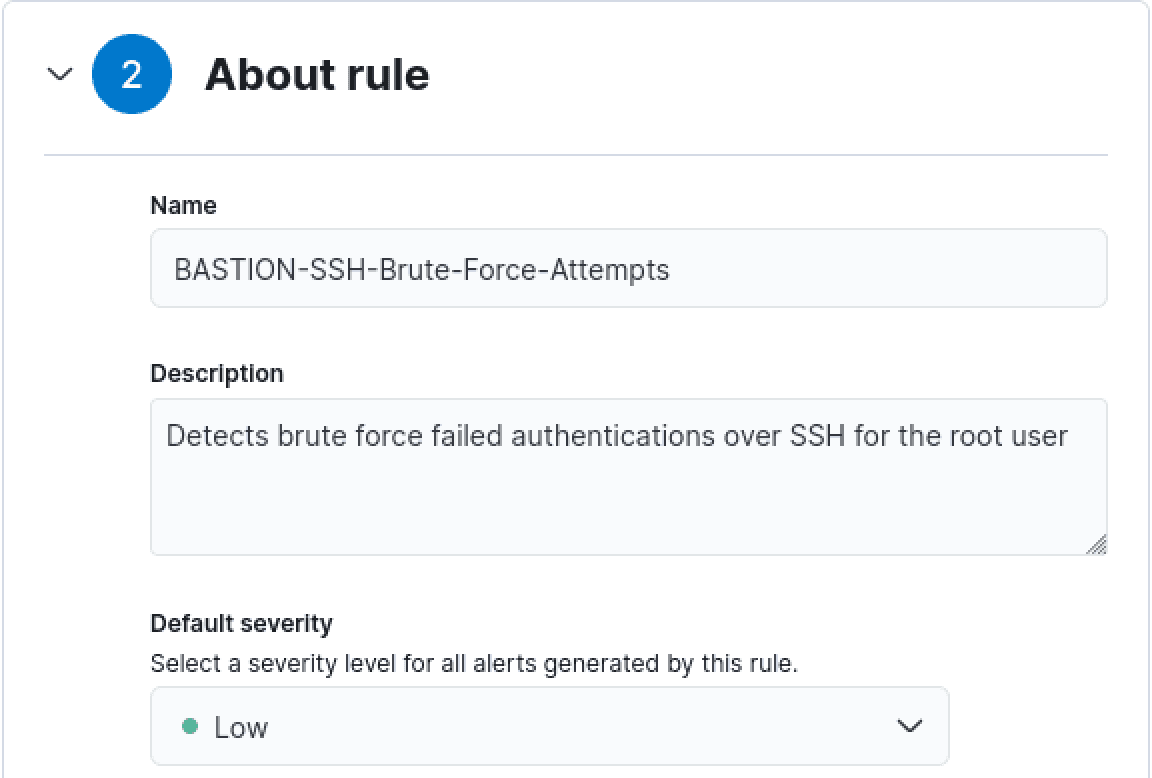
We'll then name our rule and give it a description
We'll then name our rule and give it a description
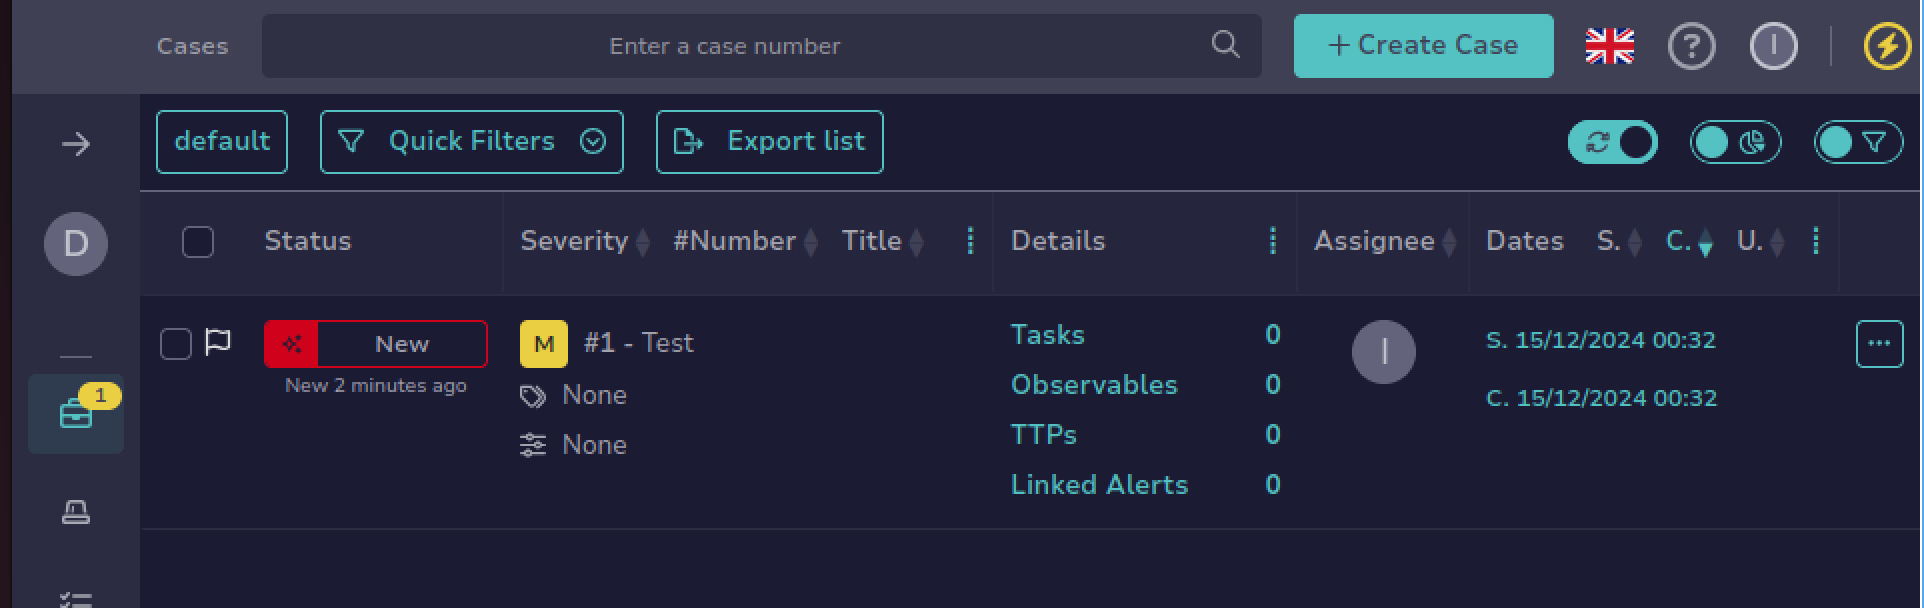
After running our SSHBastion VM with password authentication enabled for some time, we observe that our alerting system is actively detecting real-world failed login attempts. Upon exceeding the defined threshold of failed SSH authentication attempts, a new case is automatically generated in TheHive, confirming that our alert workflow is successfully forwarding alerts and escalating incidents.
This validates that:
✔ Kibana is correctly detecting and logging failed SSH authentication attempts.
✔ The SIEM rule is actively monitoring authentication failures and triggering alerts.
✔ TheHive is successfully receiving alerts and creating cases for further analysis.
Compliance Considerations:
NIST 800-53 CA-7 (Continuous Monitoring): Requires real-time security event detection and response.
ISO 27001 (Incident Identification): Ensuring unauthorized access attempts are logged and escalated.
PCI DSS (Security Incident Detection & Reporting): Requiring an automated response to detected security threats.
To enable automatic IP banning and brute-force prevention, we install Fail2Ban on our SSHBastion jump host server.
Fail2Ban is a log-based intrusion prevention system that monitors authentication logs for repeated failed login attempts and automatically blocks offending IP addresses based on pre-defined rules.
By integrating Fail2Ban with our security stack, we ensure that malicious actors attempting brute-force SSH attacks are detected and blocked in real time, reducing the risk of unauthorized access.

Compliance Considerations:
NIST 800-53 AC-7 (Unsuccessful Login Attempts): Enforces automatic account and IP lockout policies for excessive failed authentication attempts.
ISO 27001 A.9.4.3 (Password and Authentication Failures): Requires security measures to prevent unauthorized login attempts.
PCI DSS (Strong Authentication Controls): Mandates mechanisms to mitigate brute-force attacks on authentication systems.
Next, we copy the Fail2Ban configuration (fail2ban.conf) and jail configuration (jail.conf) files to our local Fail2Ban directories. This step is crucial because Fail2Ban updates can overwrite default configuration files, potentially removing custom security settings if modifications are made directly within the original .conf files.
To prevent this, we'll copy the default configuration files to local versions (fail2ban.local and jail.local).

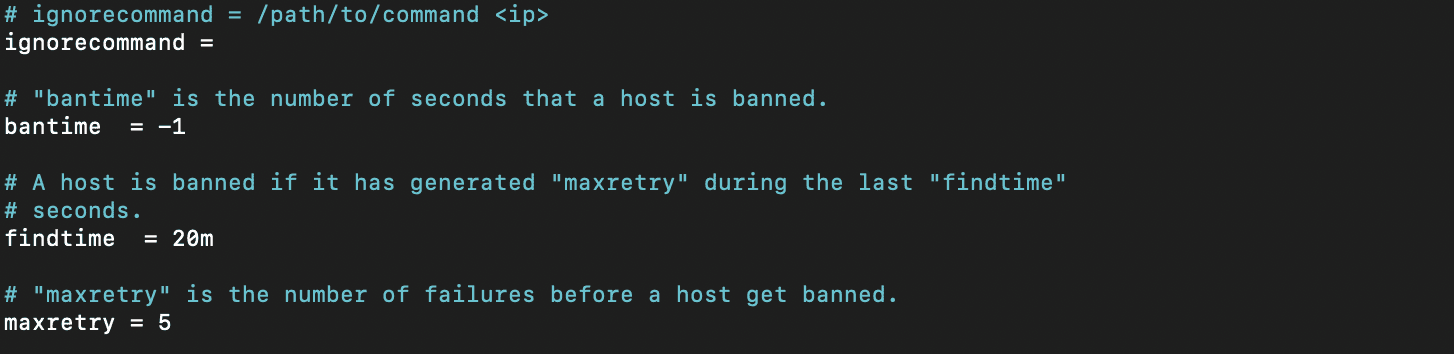
Within our jail.local configuration file, we define the following Fail2Ban security parameters:
maxretry = 5→ Blocks an IP after five failed SSH login attempts.bantime = -1→ -1 value permanently bans the offending IP.findtime = 20m→ Monitors failed login attempts within a 10-minute window.
This configuration ensures that if an IP fails authentication four times within a 20-minute period, it is automatically and permanently blocked from further SSH access. By implementing strict brute-force prevention measures, we significantly reduce the risk of unauthorized access to the SSHBastion VM.
Compliance Considerations:
NIST 800-53 (Unsuccessful Login Attempts): Enforces automatic account and IP lockout for repeated authentication failures.
Compliance Considerations:
NIST 800-53 (Unsuccessful Login Attempts): Enforces automatic account and IP lockout for repeated authentication failures.
V. Multi-System Alerting & Notifications
V. Multi-System Alerting & Notifications
Next, we integrate Slack notifications into our alerting workflow, ensuring that brute-force SSH alerts are forwarded to our DemoOrg workspace for real-time visibility. To accomplish this, we configure a Slack Connector in Kibana, following the same process used for TheHive integration.
During setup, we utilize a Mustache template to structure the alert message format, ensuring that each notification provides clear, actionable context for security analysts. This includes details such as:
Source IP address of the failed login attempt
Geographic location (if available)
Username used in the authentication attempt
Number of failed attempts and detection threshold exceeded
By integrating Slack into our workflow, we ensure that security teams receive immediate alerts, enabling rapid investigation and response

To enable automated alert delivery to Slack, we need to create a Slack app with a bot account that will post alert messages whenever our rule is triggered.
To begin, we navigate to Slack API and proceed to:
Select "Create a New App" under the Your Apps section.
Define Kibana-Alerts as the app’s name and assign it to our DemoOrg workspace.
Enable "Incoming Webhooks" to allow Kibana to send messages via the bot.
This Slack app and bot integration ensures that security events are delivered in real time to the appropriate Slack channel, allowing analysts to quickly review and respond to potential threats.


Next, we copy the webhook URL generated by our Slack app and configure it within our Kibana Slack Connector. This allows Kibana to send alert notifications directly to Slack whenever the detection rule is triggered.
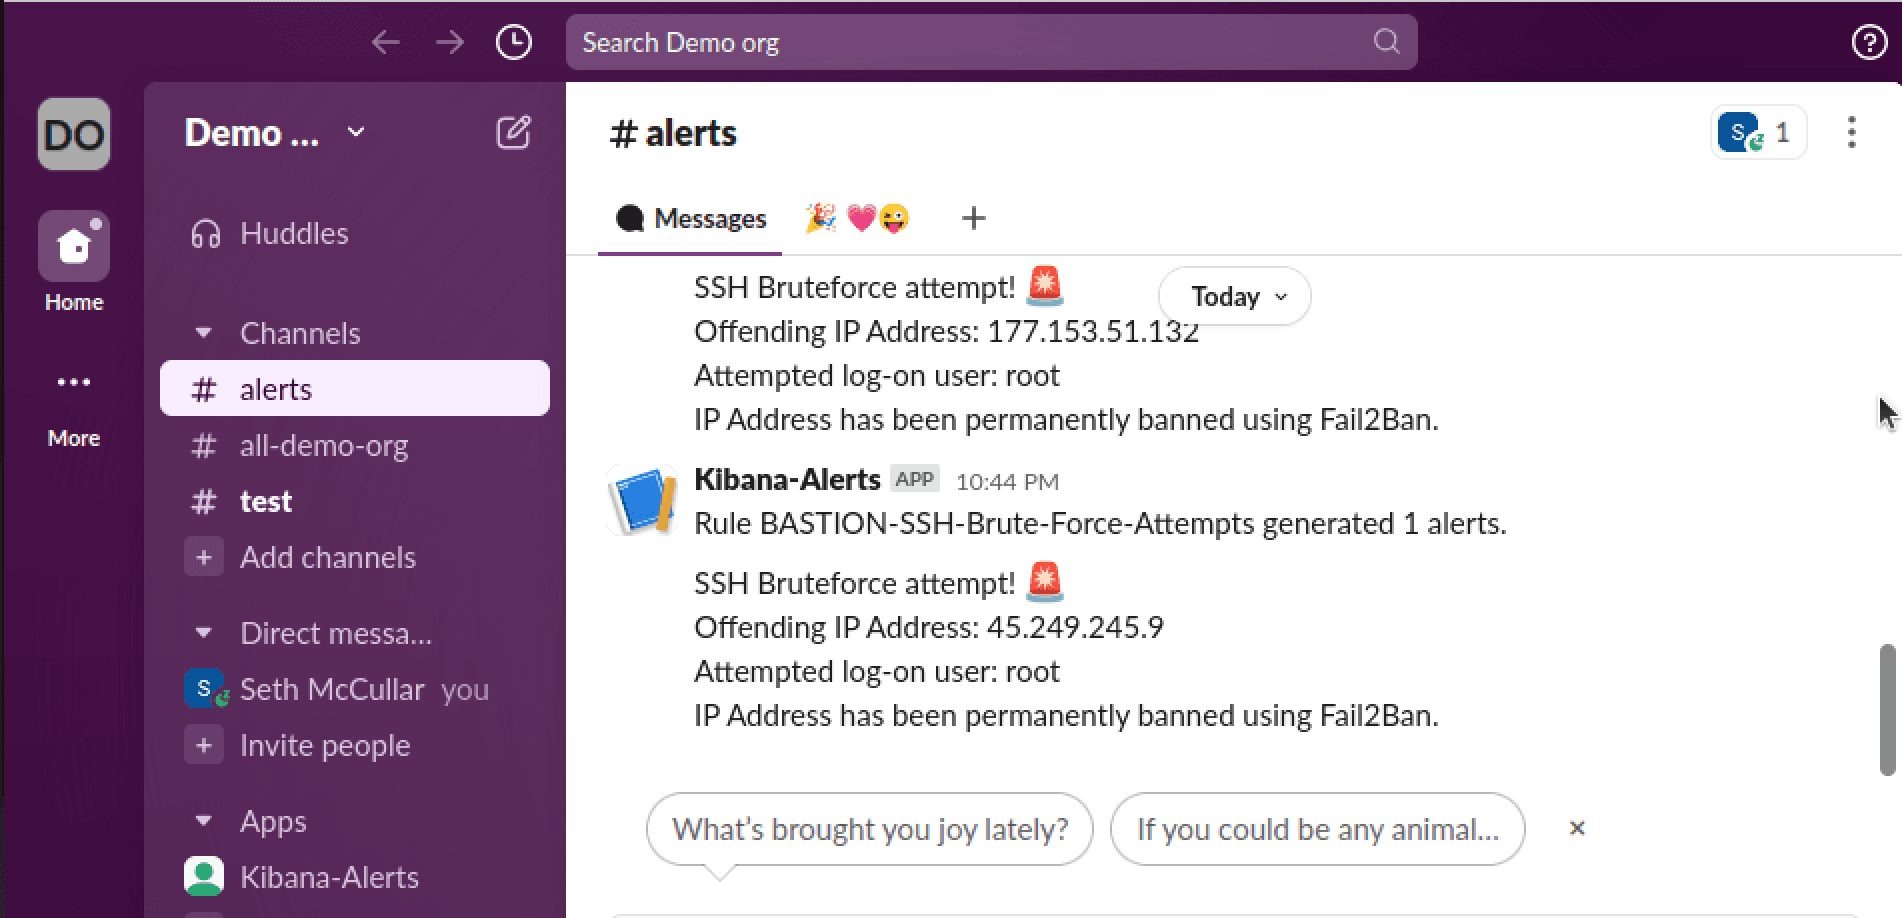
Once configured, we verify the integration by monitoring the designated Slack channel. As brute-force login attempts occur, we should see real-time alerts displaying:
The source IP address of the failed SSH attempts
Geographic origin (if available)
Username used in the authentication attempt
Threshold condition exceeded (e.g., 4 failed attempts in 2 minutes)
This integration ensures that security teams receive immediate notifications, allowing for rapid investigation and response to unauthorized access attempts.
Next, we copy the webhook URL generated by our Slack app and configure it within our Kibana Slack Connector. This allows Kibana to send alert notifications directly to Slack whenever the detection rule is triggered.
Once configured, we verify the integration by monitoring the designated Slack channel. As brute-force login attempts occur, we should see real-time alerts displaying:
The source IP address of the failed SSH attempts
Geographic origin (if available)
Username used in the authentication attempt
Threshold condition exceeded (e.g., 4 failed attempts in 2 minutes)
This integration ensures that security teams receive immediate notifications, allowing for rapid investigation and response to unauthorized access attempts.
VI. SSH Security Enhancements
VI. SSH Security Enhancements
Finally, as we conclude this project, we implement additional security measures to further harden SSH access on our SSHBastion jump host. These changes ensure that only authorized users can access the system securely, reducing the risk of unauthorized access.
The first step is to disallow SSH logins for the root account, preventing direct root access via SSH. This mitigates the risk of privilege escalation attacks, as an attacker would first need to compromise a lower-privileged user account before attempting to escalate privileges.
To enforce this, we modify the /etc/ssh/sshd_config file and set:

After, we'll restart the service,By disabling root logins over SSH, we reduce the attack surface and enforce least privilege principles, ensuring that all administrative actions require proper user authentication and privilege elevation.
After, we'll restart the service,By disabling root logins over SSH, we reduce the attack surface and enforce least privilege principles, ensuring that all administrative actions require proper user authentication and privilege elevation.
Compliance Considerations:
NIST 800-53 AC-6 (Least Privilege): Restricts direct root access to prevent privilege escalation.
ISO 27001 (Management of Privileged Access Rights): Requires proper controls for administrative access.
PCI DSS (Secure Authentication for Administrative Access): Mandates restrictions on direct root login to prevent unauthorized access.
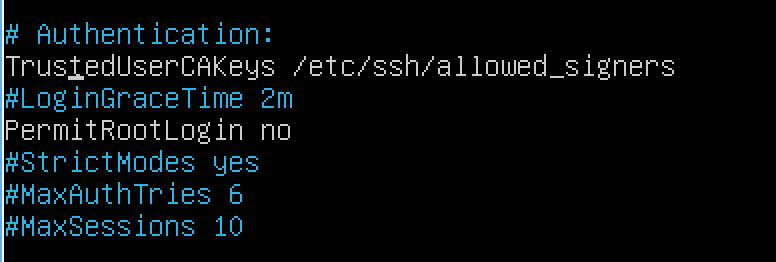
Next, we further harden SSH authentication on our SSHBastion jump host by eliminating password-based authentication and enforcing public key authentication. This prevents brute-force attacks while ensuring that only cryptographically validated users can access the system.
To achieve this, we modify the /etc/ssh/sshd_config file and apply the following security settings:
PasswordAuthentication no→ Disables password-based logins, eliminating brute-force vulnerabilities.
PubkeyAuthentication yes→ Enables public key authentication, enforcing certificate-based access control.KbdInteractiveAuthentication no→ Disables keyboard-interactive authentication to prevent alternative login prompts.

Compliance Considerations:
NIST 800-53 IA-2 (Identification and Authentication): Requires strong authentication mechanisms for system access.
ISO 27001 (Secure Logon Procedures): Enforces secure authentication methods, including public key cryptography.
PCI DSS (Strong Authentication Controls): Mandates the use of non-password authentication methods for administrative access.
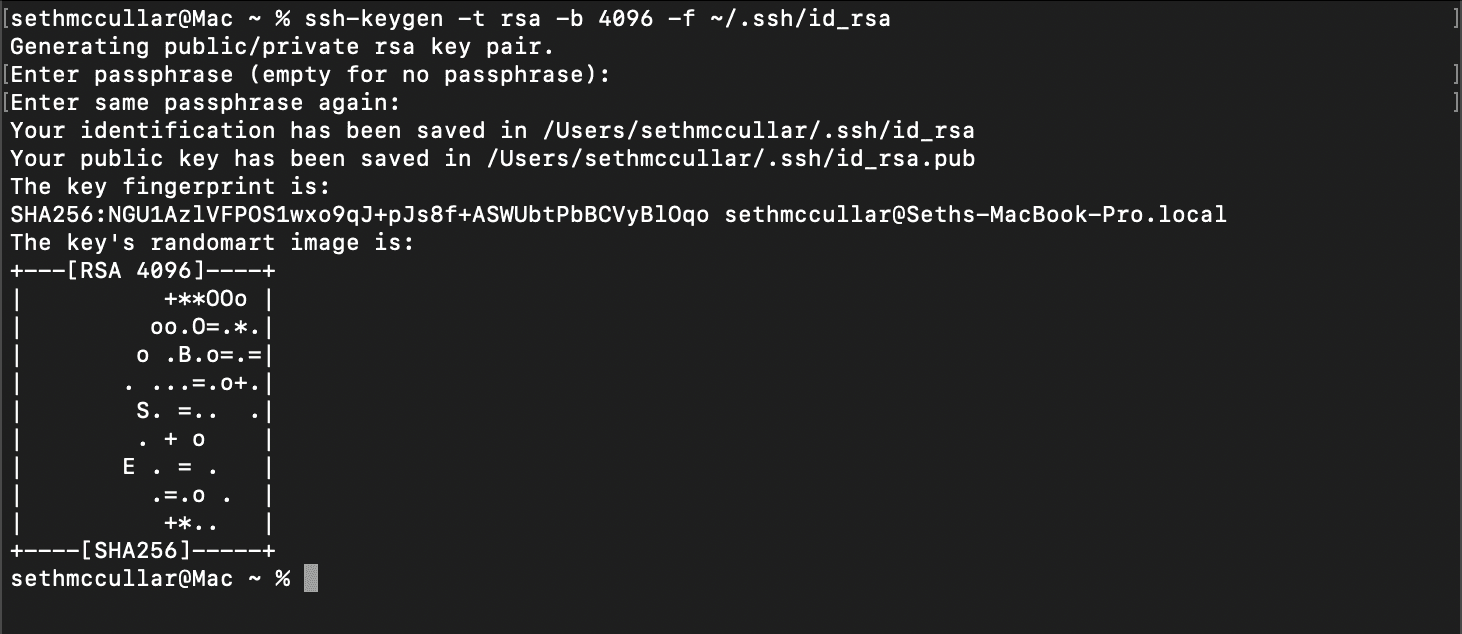
Next, we'll generate a public key to use for certificate-based access from our remote endpoint using the ssh-keygen tool
Next, we'll generate a public key to use for certificate-based access from our remote endpoint using the ssh-keygen tool

Next we'll add our CA's public key to our machine's trusted signers list, and update our sshd_config file to trust the allowed_signers file
Next we'll add our CA's public key to our machine's trusted signers list, and update our sshd_config file to trust the allowed_signers file

In order for our user certificates to be valid, they must be signed by the Trusted CA on the SSHBastion machine. To begin distributing signed certificates, we'll use the ssh-keygen utility to create a certificate with:
In order for our user certificates to be valid, they must be signed by the Trusted CA on the SSHBastion machine. To begin distributing signed certificates, we'll use the ssh-keygen utility to create a certificate with:
/etc/ssh/ca_key as the CA private key to sign the certificate
-I user_cert as the certificate ID
-n sshbastion-user restricting the certificate to sshbastion-user
-V setting a certificate validity period of one year
id_rsa.pub as sshbastion-user's public key

Next we'll generate a public/private key-pair on our remote endpoint, and scp that public key to the SSH Server
Next we'll generate a public/private key-pair on our remote endpoint, and scp that public key to the SSH Server

Next, we create an SSH certificate for the sshbastion-user, ensuring that only authorized remote endpoints can access the SSHBastion jump host. Instead of relying solely on SSH keys, this method introduces an additional layer of trust and centralized access control by using a Certificate Authority (CA) to sign SSH keys.
To generate the certificate, we use the ssh-keygen utility, specifying the following parameters:
-s /etc/ssh/ca_key → Uses the CA’s private key to sign the certificate.
-I sshbastion-user_cert → Assigns a certificate ID for tracking and revocation.
-n sshbastion-user → Restricts the certificate’s usage to the sshbastion-user account.
-V +365d → Sets a validity period of 1 year (365 days).
-z 1 → Assigns a unique serial number to the certificate.
~/.ssh/id_rsa.pub → Specifies the public key being signed.

We'll then transfer the newly created cert back to our remote endpoint
We'll then transfer the newly created cert back to our remote endpoint

Now, we configure the SSH client settings on the remote endpoint by editing the ~/.ssh/config file. This ensures that SSH connections automatically use the correct identity file, certificate, port, and username when connecting to SSHBastion.
Now, we configure the SSH client settings on the remote endpoint by editing the ~/.ssh/config file. This ensures that SSH connections automatically use the correct identity file, certificate, port, and username when connecting to SSHBastion.

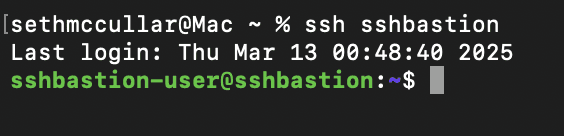
Finally, we test the SSH certificate-based authentication to confirm that our configuration is working correctly. By running the following command from our remote endpoint, we attempt to establish an SSH session with SSHBastion
If configured correctly, the connection should be established without prompting for a password, verifying that:
✔ The public key and certificate are correctly recognized.
✔ The SSHBastion server is properly enforcing certificate-based authentication.
✔ Password authentication is fully disabled, ensuring protection against brute-force attacks.
Success! This implementation provides a more secure and scalable authentication mechanism, centralizing SSH certificate management while eliminating the risks associated with password-based logins.
Success! This implementation provides a more secure and scalable authentication mechanism, centralizing SSH certificate management while eliminating the risks associated with password-based logins.
Conclusion
Through the implementation of automated brute-force detection, real-time incident response, and strong authentication mechanisms, this project demonstrates a comprehensive security approach to protecting SSH access.
The primary focus was on detecting and mitigating unauthorized SSH login attempts using Elastic Stack, TheHive, Fail2Ban, and Slack monitoring/notifying to potential security staff, ensuring that:
✔ Automated detection and alerting of persistent SSH brute-force attempts is in place.
✔ Real-time escalation of security events to TheHive enables structured incident management.
✔ Automatic IP banning with Fail2Ban prevents repeat attacks.
✔ Security notifications are seamlessly delivered to Slack for visibility and response.
At the conclusion of this project, SSH certificate-based authentication was implemented as an additional best practice demonstration, reinforcing proper SSH security principles. This step showcased how SSH should be securely configured, emphasizing the elimination of password-based authentication in favor of certificate-based access control.
In addition, I wanted the project to successfully align with industry best practices and compliance standards, ensuring adherence to NIST 800-53, ISO 27001, and PCI DSS 4.0 By combining strong authentication, proactive monitoring, and automated response workflows, this security model provides a scalable, resilient, and effective approach to securing remote access infrastructure against evolving cyber threats.